Thursday, May 30, 2013

DIY Dorm: Smartphone Projector Flop


Once upon a time there was a pin on Pinterest. It intrigued me but I doubted it would work.


The Instructions

I filed it away for a rainy day, and today was that rainy day. Ok, so, It wasn't actually raining... but it is 30 May! The day of The Pintester Movement!

I decided to test instructions for a "DIY Dorm: Smartphone Projector". I've really wanted a projector, even a cheap piece of junk one. My brother-in-law had a little one that he'd point at the ceiling so he could watch movies in bed. It didn't have very good image quality at all, but it was fun. I thought about looking for one of those, but then I found the pin and thought if I could make one for no money out of junk I had lying around the house, even better.

I started by gathering supplies.
- Shoebox - Shipping box is close enough
- Duct Tape - Very Yes
- X-acto knife - I used a steak knife
- Magnifying glass - Borrowed one from a friend
- Ruler - Pfft. (They actually don't explain how to measure anything anyways, so it wouldn't have been used even if I had bothered to find one)
- Pencil - I have a couple of those around here
- Phone stand - Who actually has one of those?

(Just so you know Zhena's Fire Light Chai is amazing with Vanilla Almond Silk)

So I followed the instructions about taping up the box and putting in the magnifying glass.
I rigged up a  hack job  very creative smartphone stand using a notebook, a brick, and a big wad of sticky tac. It worked rather well...

I took the whole contraption into the darkest room of the apartment, closed the curtains, and turned on the iPod. It looked pretty cool with the lens glowing.


To my surprise... something did appear on the wall. A vaguely glowing blob. Encouraged, I pulled up a high contrast black and white image and started messing with angles and distances. I could actually make out the picture! Not in any great detail, but I could very tell it was a guy.

I started to get excited and turned on a YouTube movie (MLP:FIM). That's when the disappointment happened. The super high contrast image looked alright, but regular images were almost impossible to make out. I tried putting an extra blanket over the window thinking maybe a darker room would help. It didn't really. Even with the high contrast image I couldn't even get a photo of anything but a blank wall.


Saturday, May 11, 2013

Butterbeer


A couple nights ago something amazing happened. My little one went to sleep easily and I actually had a little bit of energy and motivation left in me. That combo almost never happens. So I was on the hunt for something fun and quiet to do.

Then I remembered. I found this recipe over on indiejane that I really wanted to try. It's a recipe for butterbeer using butterscotch topping, cream soda, and whipping cream.

indiejanephotography

I checked the fridge and I actually had all the ingredients. The stars were lining up in my favor. Sleeping baby, energy, great looking recipe, and all the ingredients! The soda was even cold! It was a sign. This was meant to happen.

So I got all my things out and got to work. I just made a couple tiny changes to her recipe.

First, when making the butterbeer part, I mixed the butterscotch topping into a little bit of cream soda. Once that was mixed I added the rest of the cream soda. This allowed it to keep a bit more fiz. Or at least that's what I told myself.

Second, I also added a tiny bit of heavy whipping cream to the butterbeer part to make it a bit creamier.


The results were delicious. I've never been to Wizarding World, so I can't say whether or not it is accurate to the Official Rowling-Approved Version, but it was cold, sweet, creamy, buttery, and just plain awesome. It's hard to go wrong with just butterscotch topping, cream soda, and whipping cream, but this surpassed my expectations. So good. I think I'll go make some more right now...

Enjoy!

I didn't make up this recipe. I claim no ownership of it. I just thought it was amazing and wanted to share. Head over to http://www.indiejanephotography.com/2012/01/butterbeer-recipe/ for the full recipe and to give credit where it's due. Also she has much better photos than I do.

Friday, May 10, 2013

Plagiocephaly on Pinterest


We've been dealing with Plagiocephaly for a little while now and gathering tons of information. I am a researcher. I like to get all the information I possibly can before making a decision.

It makes life easier in some ways. When I come to a decision I'm confident in it.

It makes life a lot harder in others. Decisions on the fly are not a strength for me, and if I do have to make a quick decision I keep second guessing myself and regretting it.

But, that's not what I wanted to talk about today. So moving on.

I did all this research. After sifting through a million confusing bookmarks, and trying to remember where I heard what I finally thought to myself 'Self, why don't you just make a board on Pinterest. That's how you keep track of everything else.' and then myself thought back to me 'You know what, that is a great idea.'

So I have created a board where I will be compiling the most useful information I find on that subject.
It will include:

  • Repositioning and other Prevention and Early Treatment ideas for those who haven't made it to helmet stage
  • Helmet cleaning tips
  • Helmet decorating ideas (because that's just fun)
  • Amusing helmet anecdotes (if I can find any)
  • Etc.
  • Etc.
  • Etc.
  • Basically anything I find amusing or useful as related to the subject.
Here's a link to the board. Check it out! Hopefully it will be useful to some other parents out there.

Enjoy!

Wednesday, May 8, 2013

Plagiocephaly Appointment #1: Measuring


This is the second in a short series of posts about what to expect when getting a helmet. Here's links to the full series.
What to expect when getting a helmet
Appointment #1: Measuring
Appointment #2: Fitting
Appointment #3: Fine tuning
After the initial consultations and getting approval from the insurance (hallelujah!), they needed a custom model of her head. They send this model off to the shop where the helmets are made.

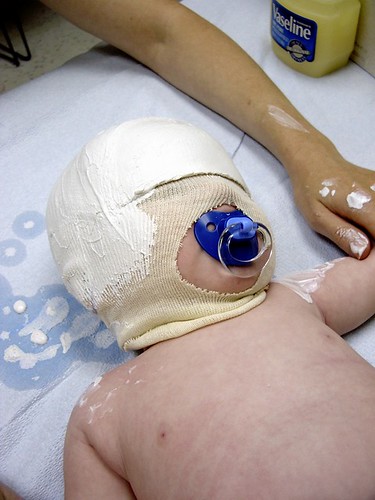
This model can be either physical or digital. To get a physical model they make a plaster cast of the baby's head (see image below). Eep. No wonder there are so many horror stories out there.

Plaster Cast
Thankfully there is another option: digital models. The process to make a digital model is much less messy and uncomfortable. Basically the doctor will just make a scan of her head.

He started by putting a stocking over her head. He cut a hole for her face and tied it under her chin like a bonnet.

He put a black cape over her shoulders so they wouldn't interfere with the scanner. Then he put little silver stickers all over her bonnet and face. The scanner uses the stickers as reference points.

The end result was comical instead of scary and uncomfortable. You can see she wasn't phased at all.

(It's really hard to take a picture of a baby and hold her at the same time)

Once she was all suited up, the doctor took out his scanner. It basically looked like an oversized handheld barcode scanner. (Next time I'm at the office I'll try to get a picture of it.)

He then began to wave the scanner around her head to scan different angles. Things got a little tricky here. My curious little one kept wiggling to face the scanner making it difficult to get a good scan of the back of her head. With much persistence we were able to get the angles we needed and an impressive 3D model of my baby's head appeared on the computer.

To complete the order, we got to decide which helmet we wanted. We were able to choose between a STARband and a STARlight. It was a tough choice but we decided to go with the STARband. Then we got to choose the color or pattern. Then we were done! The order was sent off.

No mess, no tears (well no more than usual).


LinkWithin

Related Posts Plugin for WordPress, Blogger...