Showing posts with label Mommy. Show all posts

Wednesday, August 14, 2013

Burp Cloth and Sensory Crinkle Toy Set


I'm back! My recent hiatus was due to having family in town. My in-laws came in from China, then my side of the family came to town too. It was a blast. For a short while we had 8 people sleeping in our tiny 2 bedroom apartment. I would not recommend that long term, but for such a short time it was nice to be so close.

In other news my latest project has been for the Relief Society. I've been given a calling in the Compassionate Service Committee (coordinates assistance for anyone in the ward boundaries with any special need). Specifically I've been asked to look after the mothers with new babies!

One of the things we've wanted to do in the committee is give each new baby a little gift. We've been making little sets with burp cloths and sensory crinkle toys.

The burp cloths are super simple. I'm just going to give quick instructions assuming you already know how to sew. If you have any questions or if anything is not clear leave a comment and I'll get back to you asap.

For a set of 3 burp cloths you will need approx 1/2 yard fabric. These make small travel sized burp cloths. I recommend flannel, minky, terry or something else soft and absorbent.

  1. Prewash and dry the fabric on the settings you intend to use for the finished burp cloth.
  2. Cut a rectangle of approximately 8.5" x 13.5" out of the top fabric and one of bottom fabric You should be able to get 3 rectangles out of 1/4 yard fabric Save the scraps. I made the crinkle tows out of scraps. 
  3. Place 2 rectangles right sides together.
  4. Sew around leaving a gap of about 2". I found it easiest to leave this gap in the middle of one of the longer sides.
  5. Trim the corners.
  6. Turn right side out.
  7. Iron or finger press the edges, pay special attention to the corners.
  8. Sew around at 1/4" to give it a nice crisp look.
For the crinkle toy you will need:
5"x5" square of crinkle material. I used a worn out space saver bag.
8-12 pieces of ribbon cut to 4".
2 squares 5"x5" of fabric. I made these from scraps leftover from the burp cloths so they'd match the sets. If the scraps are too small you can piece them together for a mini quilt look. It's super cute.

Assembly is very similar to the burp cloth with a few exceptions.
  1. Fold ribbon pieces in half and place on right side of one square. The fold should be towards the middle and the loose ends sticking out. Pin in place. I recommend 2-3 loops per side depending on the width of the ribbon.
  2. (optional, but useful) Baste around to attach loops to thew fabric square.
  3. Place 2 squares right sides together.
  4. Place the crinkle material on top.
  5. Sew around leaving a gap.
  6. Trim the corners. Turn right side out. Make sure the loops are outside and the crinkle material is on the inside.
  7. Iron or finger press the edges, pay special attention to the corners and ribbons. Sew around at 1/4" to give it a nice crisp look.


    Enjoy!

Friday, July 19, 2013

Well Begun is Half Done Otherwise Entitled Let's Tidy Up The Nursery

10 and a half imaginary internet points to whoever can get the quote in the post title.

If y'all have been with me a while (like my mom or Jaci or Amy) you might remember this post form the past. So It Has Come to This (Nursery Disaster) 

Long and short of it, the crib was in my room and the baby's room became a dumping ground. A really bad one. Like you couldn't even see most of the floor. Like there is no way I would want my little one in there ever. Here's a picture to refresh your memories.


It hurts me to look at that. Anyways, you may have remembered that I had a goal to get that room safer and have her sleeping in there by the time we got back from our trip. And I realized the other day that I haven't updated on that.

Funny story, I actually realized that because of a glitch in an app. I was chatting (I thought) with my husband. I asked where the cleaning spray had wound up since he was the last to use it. He responded that he didn't know, but maybe in the baby's room because it was a dumping ground.

I went on to scold him because the room was no longer a dumping ground because I un-dumping-grounded it and that it needed to stay baby safe.

Then I turned off the screen and went to pack the diaper bag. When I returned to the iPad the name and picture on the chat had changed and I realized I'd been chatting with Amy the whole time! She thought I was teasing saying she was the last one to use it and played along through the whole scolding. (Also the cleaner turned up in the kitchen not the baby's room, so she was safe.)

That's when I realized that I hadn't posted un-dumping-grounded photos yet.  It's time to fix that situation. I'll have you know I reached my goal and before we even left on our trip she was sleeping in her own room!


I still consider this to be a Work in Progress because I have some more cute decorating ideas, but it is 57 million times better than it was. And here's the proof!


So the nursery disaster has been Averted! The little one sleeps in there and she sleeps well. I (of course) had more trouble with the transition than she did.

In another post I'll explain how I managed to declutter.

Stay tuned!

Thursday, July 18, 2013

The 6 Baby Gear Items You Actually NEED


I'm the first out of my close friends to have a baby. Since then I've had several friends asking me for advice on gear, what babies really need, and how to save money (because we're all poor students or recent graduates still).

There is a minimum cost associated with a baby. There is the cost of actually having the baby. There are some costs that are essential. Then there is the gear. Gear can cost as much as you are willing to spend. People try to convince that you NEED a $200 diaper bag, a $100 bedding set, a magical trash can, and a million other little things that add up to eat all the money you are willing to throw at it.

All that stuff might really be convenient, adorable, amazing, time saving, possibly even life-changing. However, very little (if any) of it is life-giving, life-saving, or absolutely necessary. You might love it, but you don't need it.

Today I'm going to talk about the 6 things that I believe are absolutely necessary to fulfill the basic physical needs of most babies under normal circumstances. I've tried to think of ways to get by without, these are the only 6 I couldn't find a way around.

1. Carseat 

Car safety is so important. Most places won't let you take a baby home without proving that you have a carseat. Maybe you could live without one if you had your baby at home and then never took the child anywhere not within walking distance for the first few years of his life...

Options:
Infant carrier carseat, convertible carseat
Save money by:
Buying a carseat that is approved for both front and rear facing so they won't grow out of it as quickly. This might be a larger initial investment, but you won't have to buy a second carseat as soon. My little one outgrew her infant carseat at about 7 months.
DO NOT save money by:
Buying a used carseat or using an expired carseat (I had no idea befor my little one was born that those expire, but they do).

2. Safe place to sleep

The standard option is a crib. A friend of mine had her baby sleep in a laundry basket for the first few months. I'm guessing she padded it. I don't know how though. It was nice because she could move it from room to room and keep an eye on him while he slept. In Finland many newborns sleep in cardboard boxes.

Options:
Crib, bassinet, Moses basket, the floor in a very babyproofed very low traffic room, ...
Save money by:
Skipping the bassinet and just buying the crib.
Buying a crib that converts into a toddler bed. Look for one where the conversion kit is included so you don't have to go hunting and buying more parts later.

3. A way to feed the baby 

Babies need to eat. There is no way around that. Crazy huh? For some people feeding options are a heated subject. I have my own opinion that I might talk about in a later post, but not here. 

Options: 
Nursing, pumping, formula feeding, or a combination 
Save money by:
Nursing. You don't have to buy formula, your body makes it for you and it's always the right temperature and you don't have to worry about storing it. 
Off brand formula. I usually buy from Simply Right from Sam's Club. We haven't noticed a difference from when we bought the more expensive brands. 
Hoarding formula samples while your pregnant. There are usually samples at the doctors office. Take one at every appointment. Even when you're only 8 weeks along.
Try a manual pump if you only need to pump occasionally, are not sure if pumping is for you, or are willing to put forth a lot of effort to save money. (There is also the option of hand expressing.)

4. Diapers & Wipes 

It is important that excrements are properly contained and disposed of. I couldn't think of a way out of this one. Maybe let them live in the bathtub. In China babies wear split pants and no diapers so they can go whenever they want to. I do not consider that a valid option.

Options:
Disposable, cloth, or a combination.
Save money by:
Cloth diapering. It's a bigger initial investment, but if you get the one-size diapers they can be worn all the way till potty training.
Trying off brand disposables.
Shopping sales and couponing.

5. A way to keep them warm/cool

When you think about it, baby couldn't care less if he is styling or not. If the ambient temperature is right he'd be fine in just a diaper. (In fact, he'd probably be happy without a diaper too, but that would be bad for other reasons.) He might even be happier without clothes because he didn't have to go through the trauma of getting his little head and arms tucked through little holes in fabric.

I'm not arguing against clothes. In fact, I love baby clothes. They are so cute! They are also an important part of society and culture. I'm just saying they are extras. Awesome extras, but not essential for life. Just remembering that could help you save a lot of money.

Options:
Clothes, blankets, heating/air conditioning
Save money by: 
Shopping sales, clearance, and couponing.
Hand-me-down or consignment sale clothes and blankets. Babies grow so fast that a lot of these clothes are in great condition.
Fighting the urge to buy every adorable thing you see.

6. A way to wash the baby

My little one actually hated her infant bathtub. We used it only a handful of times over the months and she screamed the whole way through each time. She was a calm baby, so I would just shower with her. I'd clean myself and then my husband would hand me the baby. We have a shower bench, so I could sit with her on my lap. When she could sit supported she got squirmy and started to prefer the inflatable ducky tub.

Options:
Baby baths, sponge baths, showers
Savemoney by:
Using the sink Showering (carefully)

Hope this helps!

Sunday, July 7, 2013

Plagiocephaly Appointment #3: Fine Tuning


This is the fourth in a short series of posts about what to expect when getting a helmet. Here's links to the full series.
What to expect when getting a helmet
Appointment #1: Measuring
Appointment #2: Fitting
Appointment #3: Fine tuning
At the last appointment we were given the brand new helmet with instructions to ease her into wearing it. We were also given instructions to look out for spots where the helmet was tight or rubbing. We would recognize these spots because they would leave red marks on her head. Each time we took the helmet off, especially for the first week, we were supposed to check for red spots and keep track of how long it took them to fade away.

If any spots were not fading away within the hour her helmet was off or were becoming raw or irritated we were supposed to leave the helmet off and schedule an adjustment as soon as possible. That didn't happen for us. There were some spots that were red each time, but they were all mild enough that we could wait until the next appointment.

After she had been in the helmet about a week we had our fine tuning follow up appointment.

This appointment was very straight forward. The doctor asked us how we were doing, if we'd noticed any reoccurring red spots, and if we had any other concerns.

Then he examined her head. I pointed out where she had been getting red each time.

What happened next was the funny part. He got out a stocking and put it over her head like at the measuring appointment. Then instead of pulling out the reflective stickers he pulled out a tube of lipstick!

He smeared a bit of lipstick on her head where the helmet was rubbing and replaced the helmet. After wiggling the helmet around a bit he took it back off and showed me the inside. There were lipstick marks in the helmet showing exactly where it was rubbing her head. That made it easy for him to go shave those spots down to give her more space there.

That was it. The helmet was custom made and fitted just for her. Since then our appointments have been very simple. Once a month we visit. He takes her measurements and compares them against the previous measurements so we can see what progress she's made. He asks if we've been having any problems, checks for redness, and sometimes makes small adjustments.

She still is annoyed when we hold her still to get the helmet on or off. Sometimes she cries then. When we take it off she spends lots of time touching her head. It's a strange sensation to her. Other than that she doesn't mind wearing it at all.

Here's wishing as smooth and enjoyable experience for other helmet parents.

Monday, June 10, 2013

Plagiocephaly Appointment #2: Fitting


This is the fourth in a short series of posts about what to expect when getting a helmet. Here's links to the full series.
What to expect when getting a helmet
Appointment #1: Measuring
Appointment #2: Fitting
Appointment #3: Fine tuning
Sorry this post has been so long coming. I had it all written, published, I went to add one more link and the computer messed up and lost it all. It was not the best day already, so I was really frustrated and needed to step back and write about other things for a couple weeks. So I did and now I'm fine.

A week or so after the measuring appointment we went back in for the initial fitting. Between the appointments the company that makes the helmets had taken the 3D computer model of my daughters head and used that to make a styrofoam type model exactly her size and shape. They had then added what looked like plaster over the model to make the model head nice and round. They then used the improved model to make the helmet.


This process makes sure that the helmet is not smaller than the baby's head. Her doctor told me over and over, the helmet works with the baby's growth. It won't squish the too big parts back into place. Instead it sits right up against the too big parts and has extra space inside over the too small parts. When the head grows it will fill in where there is extra space instead of trying to push out everywhere else.


We went in and the doctor had the custom helmet all ready for us. Also that head model for us to see.


The first time the doctor put it on it was way too long over the forehead and down the neck and it didn't have big enough holes for the ears. They do that on purpose. It's much easier to cut off extra than to add more. He made marks to tell him where to trim it and went to the back room.

He repeated the process a few times. He'd try it on, make marks, and trim it down some more until he was satisfied.

During the process my little one was a little annoyed. She didn't know what was going on and a stranger was looking at her and touching her and putting something on and taking it off. She fussed a little bit, but my husband and I worked out a system where one of us would hold her sitting upright out on our knees and the other one would be near her face talking to her and holding up her bottle. That calmed her down quite a bit and gave the doctor space to work and see all the way around her head.

When he was satisfied that it was fitting better he drilled some little holes for ventilation and we were done.

She didn't go straight to wearing it all day. We had a schedule to ease her into it during the day. It went something like this:
Day 1: 1 hour on, 1 hour off
Day 2: 2 hours on, 1 hour off
Day 3: 4 hours on, 1 hour off, start wearing it for naps, but not overnight
Day 4: 8 hours on, 1 hour off, wear it overnight
Day 5: start normal schedule, 23 hours on

We were sent home with instructions to check her head every time we took the helmet off for red spots and to see how long it took to go away while the helmet was off. If anything was rubbing wrong we could schedule an appointment for him to fix it right away, but if things were going well the next appointment would be in a week.

From day 1 she disliked getting the helmet on or off just liked she dislikes getting dressed. She doesn't want someone to hold her still and mess with her.

Once the helmet is on though, she is completely fine with it. We never had a problem. That picture with the title was taken during the first week with the helmet and you can see she is happy with it.
Some kids might have a harder time, but usually the parents mind a lot more than the kids do.

Also the helmet looks great with steampunk costume goggles.


Friday, June 7, 2013

DIY Formula To Go Packets


Enfamil makes these great little to go packs. I got some samples in the mail and I loved them, they are so convenient! I would stick a few in my diaper bag and go. It was great. Once I used up the samples I would buy a box special each time we were going on a trip.

I would fill the bottles with the right amount of water before leaving the house. When there were needed I was ready. I just had to pour the formula in and shake. No measuring, no hunting for a drinking fountain. I had everything I needed right there.

View this product on Amazon (also this picture is from Amazon)

I have not found anything wrong with the Enfamil packets. In fact, i would highly recommend them. They're great, but there are a lot of reasons to DIY.

Maybe you need a specific type of formula or are loyal to a specific brand or want to be able to buy whatever is on sale. Maybe your child needs more or less than the 4oz at a time. Maybe you just like having options. Mostly I got sick of running out of them and carrying extra trash in the diaper bag. I wanted an option that I could refill.

One day I mentioned to a friend that I would love some resealable pouches about that size. A few days later she sent me a link to a site that makes baggies for making your own ice pops. Brilliant!

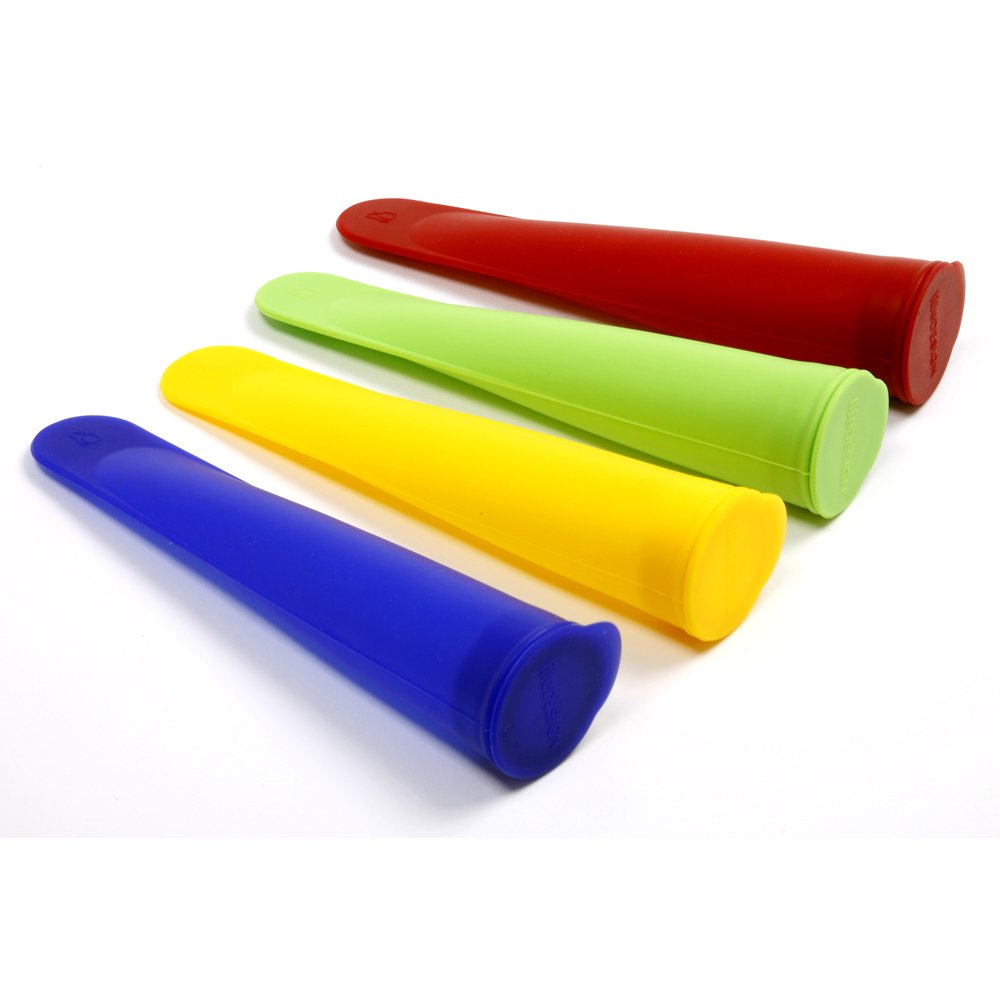
Zipcicles were a good option. ((Plus there are some delicious looking recipes on that website.)) They can be reused, but I wanted something that was specifically made to be reused. Still, this was a big step in the right direction. That got me thinking and searching around looking specifically for ice pop supplies to solve my problem.

After considering different options I chose a silicone ice pop making set from Norpro. The thing that really sold me on this set is that they are dishwasher safe! Hand washing dishes is probably my least favorite chore. Handwashing tiny baggies sounds even worse. Anything that can get me out of that is a win in my book.

These little silicone molds are a little bit bigger than I expected, but not enough to cause problems for me. Each tube holds easily enough powder for a 6oz bottle and would probably hold enough for an 8oz bottle, but I haven't tried it yet. The mouth is wide enough that if I'm careful I can scoop the formula in without having to use a funnel.

The silicone is flexible, but sturdy enough that it makes it really easy to pour powder from the mold into the bottle. Once we are grown out having to bring formula and bottles everywhere, we can make ice pops! This is not another single use item to be packed away with all the other baby things in a couple months. Also dishwasher safe. I'm so excited about that feature that I had to say it again.

The lids pop off really easily and I was afraid they'd pop off in the diaper bag, but I just squeeze the extra air out while I'm putting the lid on and I've never had a problem. I've been using them for a month or two and I've had no powder spills in the bag.

I mentioned this solution to my mom. She told me that when I was little people used to use tubes from Mini M&Ms the same way! Clever!

Whether you use Enfamil, the Zipsicles, the Silicone Molds, or the M&M tubes, you can have the convenience of premeasured powder to go and the convenience of choosing your own formula! Let me know if you have another solution.

Enjoy!
Friday, May 10, 2013

Plagiocephaly on Pinterest


We've been dealing with Plagiocephaly for a little while now and gathering tons of information. I am a researcher. I like to get all the information I possibly can before making a decision.

It makes life easier in some ways. When I come to a decision I'm confident in it.

It makes life a lot harder in others. Decisions on the fly are not a strength for me, and if I do have to make a quick decision I keep second guessing myself and regretting it.

But, that's not what I wanted to talk about today. So moving on.

I did all this research. After sifting through a million confusing bookmarks, and trying to remember where I heard what I finally thought to myself 'Self, why don't you just make a board on Pinterest. That's how you keep track of everything else.' and then myself thought back to me 'You know what, that is a great idea.'

So I have created a board where I will be compiling the most useful information I find on that subject.
It will include:

  • Repositioning and other Prevention and Early Treatment ideas for those who haven't made it to helmet stage
  • Helmet cleaning tips
  • Helmet decorating ideas (because that's just fun)
  • Amusing helmet anecdotes (if I can find any)
  • Etc.
  • Etc.
  • Etc.
  • Basically anything I find amusing or useful as related to the subject.
Here's a link to the board. Check it out! Hopefully it will be useful to some other parents out there.

Enjoy!

Wednesday, May 8, 2013

Plagiocephaly Appointment #1: Measuring


This is the second in a short series of posts about what to expect when getting a helmet. Here's links to the full series.
What to expect when getting a helmet
Appointment #1: Measuring
Appointment #2: Fitting
Appointment #3: Fine tuning
After the initial consultations and getting approval from the insurance (hallelujah!), they needed a custom model of her head. They send this model off to the shop where the helmets are made.

This model can be either physical or digital. To get a physical model they make a plaster cast of the baby's head (see image below). Eep. No wonder there are so many horror stories out there.

Plaster Cast
Thankfully there is another option: digital models. The process to make a digital model is much less messy and uncomfortable. Basically the doctor will just make a scan of her head.

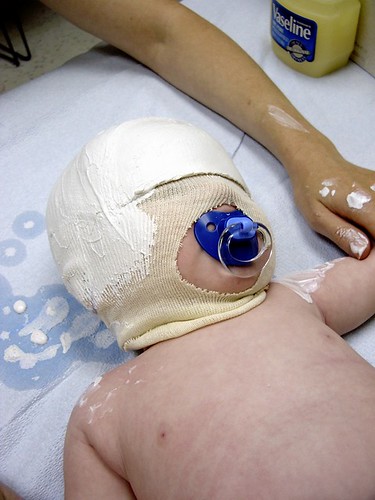
He started by putting a stocking over her head. He cut a hole for her face and tied it under her chin like a bonnet.

He put a black cape over her shoulders so they wouldn't interfere with the scanner. Then he put little silver stickers all over her bonnet and face. The scanner uses the stickers as reference points.

The end result was comical instead of scary and uncomfortable. You can see she wasn't phased at all.

(It's really hard to take a picture of a baby and hold her at the same time)

Once she was all suited up, the doctor took out his scanner. It basically looked like an oversized handheld barcode scanner. (Next time I'm at the office I'll try to get a picture of it.)

He then began to wave the scanner around her head to scan different angles. Things got a little tricky here. My curious little one kept wiggling to face the scanner making it difficult to get a good scan of the back of her head. With much persistence we were able to get the angles we needed and an impressive 3D model of my baby's head appeared on the computer.

To complete the order, we got to decide which helmet we wanted. We were able to choose between a STARband and a STARlight. It was a tough choice but we decided to go with the STARband. Then we got to choose the color or pattern. Then we were done! The order was sent off.

No mess, no tears (well no more than usual).


Monday, April 22, 2013

Plagiocephaly: What to expect when getting a helmet


I was really nervous going into the orthotics office to get a helmet. I was really didn't know how the whole process would work. I didn't know if it would be uncomfortable or even painful for her. I looked around, but didn't find much solid information about what to expect.

It seems like people only put stories out there if they are 'worth telling'. The ones that are interesting, where something goes wrong or something unexpected happens. If things go by the book, people don't really write about it.

So there I was, more nervous than my little one, having read only horror stories about the process. I expected the worst. I felt like a scumbag mommy playing with my little one in the waiting room when I knew what awaited her. They called us back. And then... Things went smoothly. The doctor was competent and my little one handled it all like a champ. The process was really was fairly straight forward and really interesting and we now have a custom helmet that I am thrilled with.

The whole process took 3 short appointments that I will discuss in more detail in the next few posts.

This is the first in a short series of posts about what to expect when getting a helmet. Here's links to the full series.

What to expect when getting a helmet
Appointment #1: Measuring
Appointment #2: Fitting
Appointment #3: Fine tuning


Monday, April 15, 2013

Summer Infant SuperSeat Review and Plagiocephaly Update

This is a review for Summer Infant 3 Stage SuperSeat. This is basically a small baby seat similar to a Bumbo brand seat with a round activity tray. With the tray removed, the seat can buckle onto most standard chairs and act as a booster. It can be purchased through Amazon.com or Babies"R"Us.
 
I mentioned before in a post entitled The Latest Mommy Guilt : Plagiocephaly that my daughter was having trouble with plagiocephaly (misshapen head). It was present at birth. In that post, I mentioned that we were getting ready for an appointment with an orthodics office. At that appointment they measured her head and she was outside the normal limits, but close. They suggested some exercises and gave us one month to try "aggressive repositioning" (keeping her off the back of her head as much as possible).

We immediately began looking for options to help her enjoy tummy time more and to keep her off her back when she wasn't doing tummy time. After looking at different baby seats, this is the one we chose.

Pros

Usable from a young age
The instruction manual says that this product can be used with children as young as 4 months old. I'd say it is most likely safe for younger children if they are holding their head up well.  My little one was 3 months when we started using it and seemed just fine.
Disclaimer: This is not official. I'm not a doctor. I will not be responsible for anything that happens. Watch your child carefully when using this product, especially if they are below the recommended age. Stop using it if there is any sign that they are not ready for it.
Wide age range
The orange foam in the seat is an insert. When the child outgrows that seat the insert can be removed allowing the child to use the seat for a longer period of time. The instruction manual says the seat can be used  for children up to 4 years old. This is a big advantage over the Bumbo. Being short on space, we didn't want anything that we'd use for only a few months and then have to store for the next kid.

Toy tray
The 360 degree toy tray spins so you can give the little one access to different toys. My little one loved the toy tray. As soon as I put her in she began grabbing at the toys. Before that I'd never seen her so immediately interested in anything plastic.

Large leg openings
Reviews I read about the Bumbo say that the leg openings are rather small and not well suited to chunkier babies. We have a healthy, robust little one with beautiful roly-poly thighs and have never had a problem with this seat. She has plenty of space.

Booster seat functionality
We needed a way to keep her off her back while we were out at restaurants with friends. At that time she was much too small for a restaurant highchair. We wound up bringing this to many restaurants. It has buckled easily and fit on every chair we've tried. Even the wide, rolling Olive Garden chairs, though the straps were barely long enough. She loves being up where she can see everyone at the table instead of in a car seat sling.

Portable
It's a little bit bulky, but I've never had a problem with it. I'd compare carrying it in restaurants and other public places to carrying a loaded diaper bag. We've taken it almost everywhere with us.

Cons

Gaudy Colors
This is a personal preference issue but where is it written that everything for babies has to use every bright shade they can possibly think of?

Difficult to clean under the spinning toy
My little one spit up once on top of that spinning ball and some of it pooled up in the base of the toy. That was a major pain to clean.

Babies can't spin the tray themselves
At 5 months now my little one seems to know that the tray spins, but cannot spin it to get at the different toys herself.

Can't use tray while using the booster functionality
It would be nice if this seat could work as a highchair, or if she could have the toys she can't drop to play with while we eat.

Insert is difficult to remove and replace
This isn't really a problem if you are planning on using the seat for only one child at a time. You would have to remove the insert once when the child outgrows it and replace the insert to use the seat for the next child. It would be really annoying to use this seat for 2 children of dramatically different sizes.

Toy tray is annoying to get on
Putting on the toy tray is not terribly difficult. It is just annoying to align everything correctly. It is not half so hard to take the tray off.

Things to look out for

Babies arms can get caught when rotating the tray
Occasionally when my daughter has had her arm outstretched while we are spinning the toy tray, her arm has gotten caught by one of the two taller toys. Those toys are not rigid so it hasn't really hurt her, but it has startled both of us.

Feet fall off
There are small plastic covers that snap onto the bottom. I assume they are to protect the floor. They don't stay on well. Being small and fairly neutral in color, it is not immediately obvious when they fall off. I don't know if they are the right size to be a choking hazard. As soon as I noticed that one fell off I took them all off and got rid of them. I'm not worried about my floors. If you are, I'd suggest buying a non-slip bathroom mat or something to put under the seat.


Overall
We have really enjoyed having this product. Our little one enjoys it. It keeps her contained, safe, and nearby when we can't hold her. We've only had this product for about 2 months, so I can't say much about the long term durability, but it was 2 months of almost constant use so I think I have a pretty good idea of the functionality. Using this seat really helped with the bi-lateral symmetry of her head which is what we were most worried about. (However, her other measurements are still off enough that we will be getting a helmet.)


Saturday, April 13, 2013

Cranberry Limeade: for brighter sunshine, extra courage, and less morning sickness

also entitled
Every Saturday at 2:00pm the alarm on my phone goes off. A message associated with that alarm pops up on my screen.
Cranberry Limeaid and Mozzarella Sticks

Why Saturday? The Sonic nearest our house does a deal every day of the week. Saturdays deal is my favorite. An order of mozzarella sticks for a dollar.

Why 2:00pm? Because that is happy hour. That is when you can get half priced drinks at Sonic.

This alarm is a remnant from the early days when I was pregnant. The days before I could down an entire cheesecake. The days when eating was an accomplishment. The days where I was losing weight and worried to death about whether the little lima bean sized alien inside me was getting what she needed.

There was only one thing I could find that would always stay down and often calm my stomach enough to keep down some solid food. I'll bet you can guess what it was...
Sonic Cranberry Limeaid
Image borrowed from http://www.sonicdrivein.com/

To me this stuff was a literally godsend. It made me feel human. It made me feel that I could continue another day, that my little one and I were going to be alright, that this wasn't all a mistake.

To this day, I like to face a difficult with a limeaid in hand, but back then every day was difficult. I drank that stuff by the pitcher-full. I needed an alternative solution for days when money felt tight or I didn't feel up to going out.

Here's what you need:
- Lemon Lime Soda (I prefer Sierra Mist Natural because its the only soda I can find that comes in big bottles and has no artificial sweeteners or high fructose corn syrup)
- 100% Cranberry Juice, Unsweetened (don't worry, with the soda it turns out plenty sweet) 
- Lime Wedges to taste
- Pellet Ice (optional, but it makes it so much more authentic, you can buy it in bags at most sonic locations and keep it in your freezer at home) 
Combine the soda and the cranberry juice using a ratio of about 6 parts soda to 1 part juice. Pour gently so you don't loose the carbonation. Add lime wedges and ice.
To fill a 2 quart pitcher I would use about 6 cups of soda, 1 cup juice, and a couple limes cut into wedges. 
To fill a 16 ounce glass I would use a cup and a half (about 1 can) of soda, 1/4 cup of juice and maybe half a lime.

We had a punch bowl full of this stuff at the baby shower my friends threw for me. It was a big hit.

Here's some random shoutouts with links to other bloggers who like Sonic Drinks.
Linda at My Name is Momma (cute picture of tiny child and giant cup)
Erin at A Nickell for Your Thoughts (another cute cup as big as child pic) 
Camille at Makoodle (cute visual message about things that make us happy)
Shannon at Sweet Blessings (Printables "This home runs on LOVE Laughter and LOTS of SONIC DRINKS." I love it!)

Enjoy!

LinkWithin

Related Posts Plugin for WordPress, Blogger...